Build comments section with Next.js and Supabase - Part 2. Create/Read comments
Web
NextJS
Supabase
Jan 22nd, 2022
•
9 min read
Let's create/read our comments, with Supabase node client.
Recap
This is a 2nd part of the Build comments section with Next.js and Supabase series.
If you hadn't read the Part 1, checkout here.
Last time we've created our Typescript based NextJS app and installed TailwindCSS for easy styling. Then we headed to Supabase dashboard to create our own PostgreSQL comments table.
In this chapter we will create and read comments with our comments form. The follow-along code can be found here.
Create comment
Add input form and Supabase client library
Our index page is kinda empty now, so we should make it look better. Replace the code in pages/index.tsx to the code down below.
import type { NextPage } from "next";
import Head from "next/head";

const Home: NextPage = () => {
  return (
    <div>
      <Head>
        <title>Comments Page</title>
      </Head>
			<div className="pt-36 flex justify-center">
        <div className="min-w-[600px]">
          <h1 className="text-4xl font-bold ">Comments</h1>
          <form onSubmit={onSubmit} className="mt-8 flex gap-8">
            <input type="text" placeholder="Add a comment" className="p-2 border-b focus:border-b-gray-700 w-full outline-none" />
            <button className="px-4 py-2 bg-green-500 rounded-lg text-white">Submit</button>
          </form>
        </div>
      </div>
    </div>
  );
};

export default Home;
We added as simple input form to create a comment. There are some styling codes added, but since this is not a TailwindCSS tutorial I will leave the explanation to better resource.
Our form looks good, but it doesn't really do anything. To create a comment, we should do this process:
- User type the comment in the form, then hit
Submit. - We somehow send the comment data to our Supabase
commentstable. - We check our table, see if the data has been added.
To perform the 2nd step, we need a Supabase node client library. Run the command below to add it.
$ yarn add @supabase/supabase-js
Make our messenger for Supabase
Now we need to create a supabase client object, which is a messenger that will help us interact with Supabase.
Add these 2 lines in pages/index.tsx.
...
import { createClient } from "@supabase/supabase-js";

export const supabase = createClient(supabaseUrl, supabaseKey);

const Home: NextPage = () => {
  return (
    <div>
...
To create a Supabase client object, we need two data: Supabase project URL and key.
These can be found in Settings > Project settings > API section in our Supabase project dashboard.
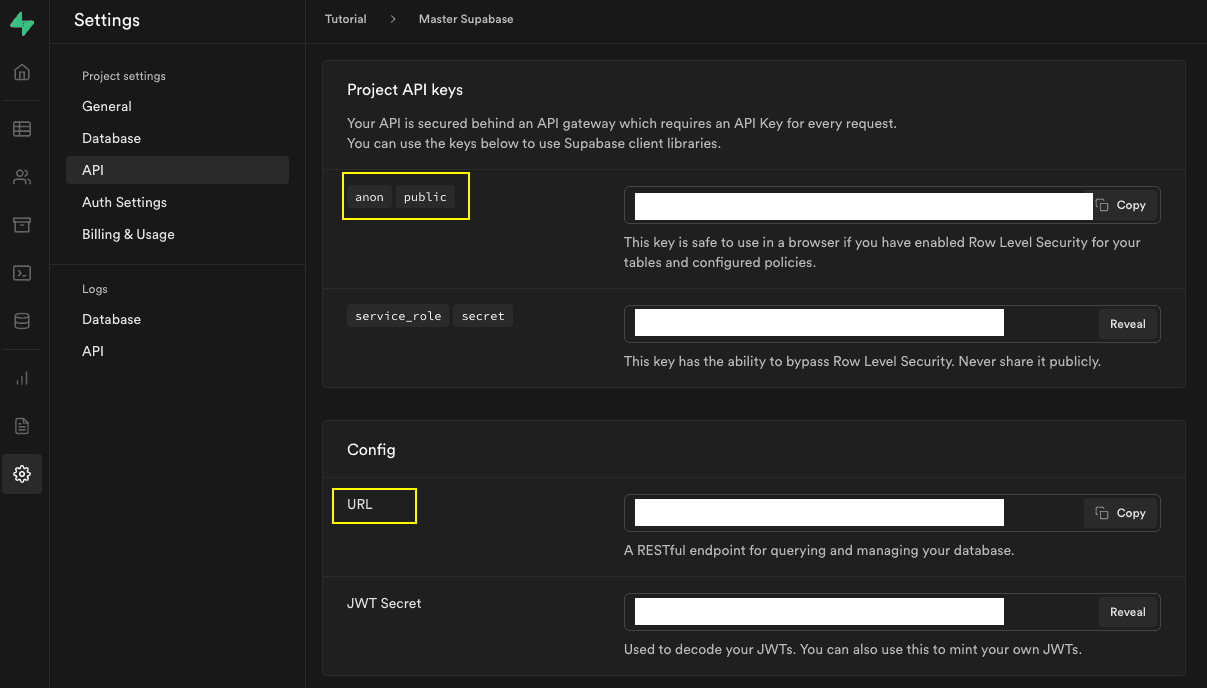
Never show this keys to someone else!
Understanding environment variables
These keys should be stored somewhere secure and separate. Many of the developers save secured data as 'environment variables', commonly shorten as 'env vars'.
Env vars also works as 'variables' which can be set differently across the environment.
For our case, we need to define env vars for development environment, and to do that in NextJS, we use .env.local file.
If you want to use the same variables in production environment, you can use .env.production file and replace the values.
Ok, now let's create a .env.local file in our NextJS app's root directory.
Then copy-paste the first key (anon/public key) in the image above and save it to NEXT_PUBLIC_SUPABASE_KEY.
For the second key (URL key), save it to NEXT_PUBLIC_SUPABASE_URL.
If done correctly, it should look like this.
NEXT_PUBLIC_SUPABASE_KEY=[first-key]
NEXT_PUBLIC_SUPABASE_URL=[second-key]
Now what's all that NEXT_PUBLIC_ prefix? NextJS handles env vars differently by their names:
- With
NEXT_PUBLIC_prefix: Those are exposed in browser, which means it can be used in client-side jobs. - Without
NEXT_PUBLIC_prefix: Those are server-side jobs.
So that means our supabase basically use those keys in browser side. Once we define or edit our .env.local file, we have to restart
the development server, so go to terminal and kill the current session with CTRL-C, and then restart with yarn dev.
Since we can use our env vars now, add and edit the following lines in pages/index.tsx.
...
import { createClient } from "@supabase/supabase-js";

const supabaseUrl = process.env.NEXT_PUBLIC_SUPABASE_URL ?? "";
const supabaseKey = process.env.NEXT_PUBLIC_SUPABASE_KEY ?? "";

export const supabase = createClient(supabaseUrl, supabaseKey);

const Home: NextPage = () => {
  return (
    <div>
...
The extra ?? "" after each env var initalization is to prevent them to be undefined type, which then createClient won't accept it.
Send an insert request
Before we use our supabase messenger, we will first get user's comment payload from our input form.
To do that,
- Add a
commentreact state for the placeholder of user's comment payload. - Add
onChangefunction to update the comment payload incommentwhenever the payload is changed. - Add
onSubmitfunction to handle the submit behavior of the form. In our case we don't want to reload everytime when we submit the form, so we useevent.preventDefault().
The code change will be as following.
...
const Home: NextPage = () => {
  const [comment, setComment] = useState<string>("");

  const onChange = (event: ChangeEvent<HTMLInputElement>) => {
    const commentValue = event.target.value;
    setComment(commentValue);
  };

  const onSubmit = (event: FormEvent<HTMLFormElement>) => {
    event.preventDefault();
		console.log(comment);
  };
...
		<form onSubmit={onSubmit} className="mt-8 flex gap-8">
			<input
				onChange={onChange}
				type="text"
				placeholder="Add a comment"
				className="p-2 border-b focus:border-b-gray-700 w-full outline-none"
			/>
...
To test if it works, open the Devtools for your browser and head to Console tab, type something in the input and hit Submit.
If succeeded, it will show like the image below.
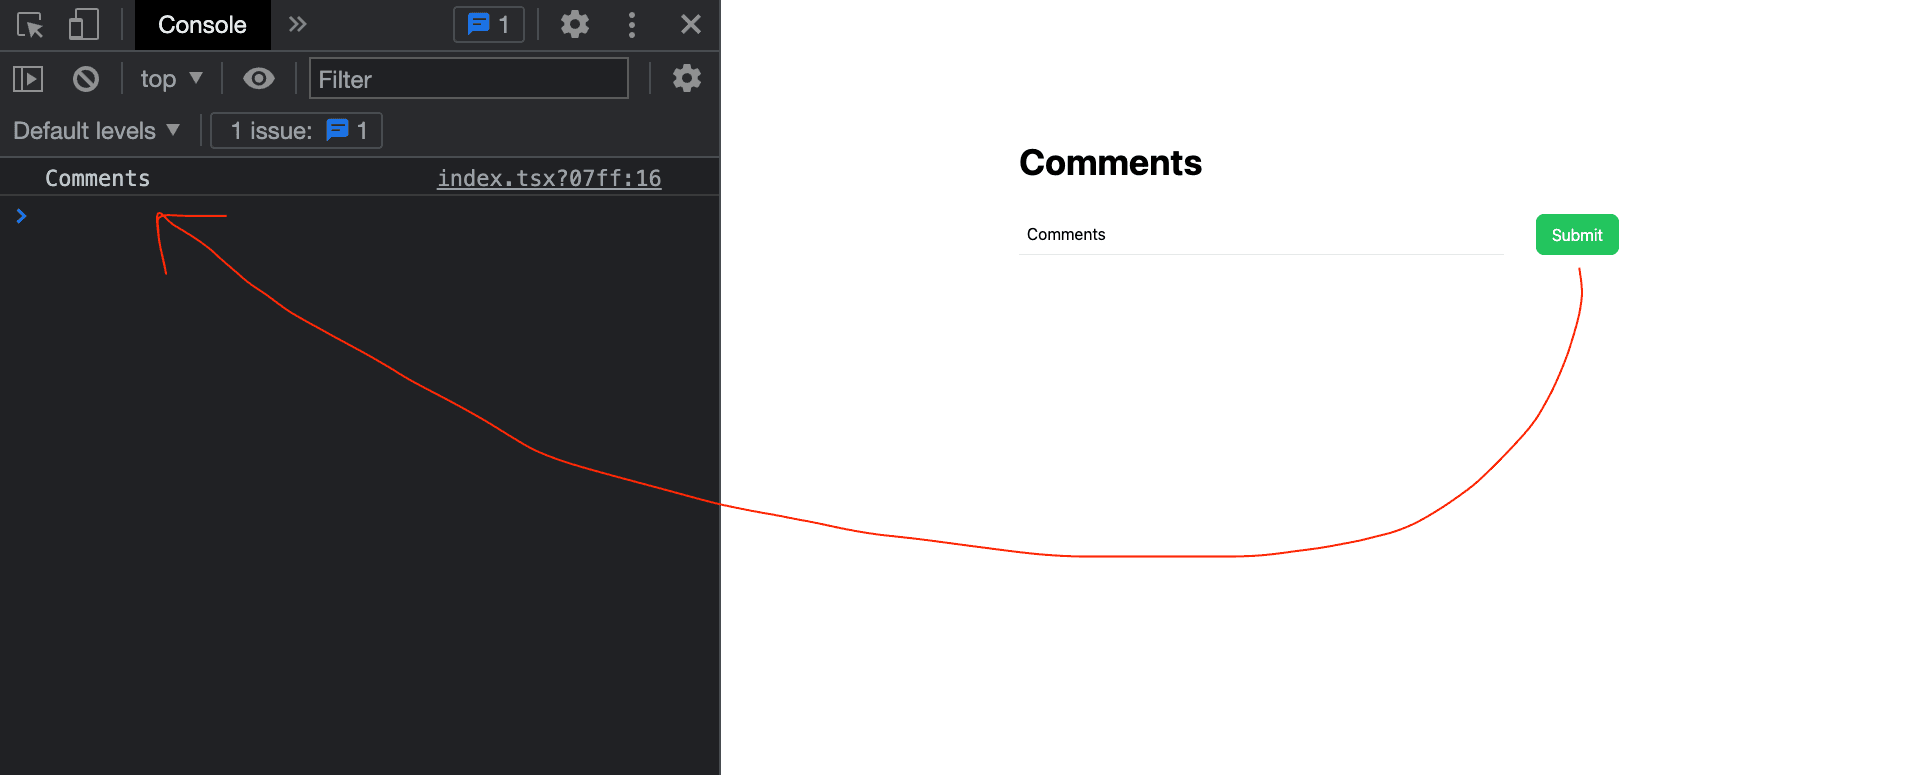
Browser devtools are must-use utility for every web developers.
Now we'll use our supabase client to create a comment. In SQL table's perspective, it will basically add a new row.
Replace onSubmit function to code down below. Don't forget to add an async keyword since the supabase client api returns a Promise.
...
  const onSubmit = async (event: FormEvent<HTMLFormElement>) => {
    event.preventDefault();

    const { data, error } = await supabase.from("comments").insert({
      username: "hoonwee@email.com",
      payload: comment,
    });

    if (!error && data) {
		// If succeed
      window.alert("Hooray!");
    } else {
		// If failed
      window.alert(error?.message);
    }
  };
...
Let me disect the await supabase part real quick:
-
.from("comments"): This indicates which table should be looked for, since theoretically we have lot's of table in project. -
.insert(table_row): By usinginsert, we create a new row in ourcommentstable with give table_row data.- As you can see, we have only put
usernameandpayloadin ourtable_row, because the rest of the data will have it's default value.
- As you can see, we have only put
-
const { data, error }: Supabase will give us a response containingdatawhich contains information of our action, anderrorif there's an error.
Now let's write something again and hit Submit. And if you have succeeded, you'll see an alert window containing Hooray! message.
Well that's pretty nice, but we still don't know whether our data has been sent or not.
Head to comments table in Supabase dashboard, and you'll see a new data row inserted.
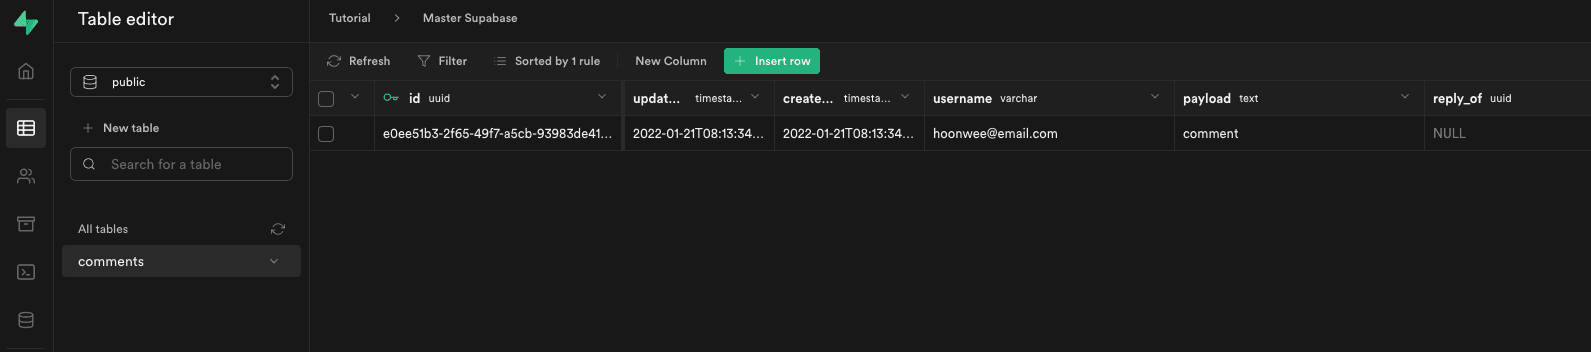
Hooray! Comment added!
Read comments
Create a comment list
Okay great, now we can create comments but we also want to display them in our web page. To do that we'll do following steps:
- We get all the comments from the
commentstable. - We display it - in list-like format.
- We will sort then by
created_atdata to see them chronologically.
First we should add some UI for the list! Add the following code in pages/index.tsx.
...
export const supabase = createClient(supabaseUrl, supabaseKey);

interface CommentParams {
  id: string;
  created_at: string;
  updated_at: string;
  username: string;
  payload: string;
  reply_of?: string;
}

const Home: NextPage = () => {
  const [comment, setComment] = useState<string>("");
  const [commentList, setCommentList] = useState<CommentParams[]>([]);
...
          Submit
        </button>
      </form>
      <div className="flex flex-col gap-4 pt-12">
        {commentList.map((comment) => (
          <div key={comment.id} className="border rounded-md p-4">
            <p className="font-semibold mb-2">{comment.username}</p>
            <p className="font-light">{comment.payload}</p>
          </div>
        ))}
      </div>
    </div>
...
Let's disect this part real quick:
- Below our
formelement we added a comment list section, iterated bycommentListreact state that we newly created. - The
commentListstate has a array-type ofCommentParamsinterface, which contains all the column names for each object key. - The question mark
?atreply_offield indicates that this field is optional.
Send a select request
Before moving to next step, I want you to add more comments using our form
- because once we succeed to get the comments from supabase, it will look awesome when we have bunch of comments.
Once you've done adding more comments, now let add a new function called getCommentList that will use supabase client to
get all the comments. Add the code down below.
...
  const [commentList, setCommentList] = useState<CommentParams[]>([]);

  const getCommentList = async () => {
    const { data, error } = await supabase.from("comments").select("*");
    if (!error && data) {
      setCommentList(data);
    } else {
      setCommentList([]);
    }
  };

  useEffect(() => {
    getCommentList();
  }, []);
...
Right now getCommentList function will be called once only, when we first render our page.
To do that we will call our getCommentList in useEffect hook. Since the useEffect hook has no external dependency,
this will invoke the inner part only once when the component is rendered.
Now check our web page. It will look much like other comment sections!

It now looks very functional.
Sort comments by created order
Now our Supabase client takes the comment list in created order,
but soon after when we edit and reply to some of the comments it would bring them by updated order.
So we should do a little tweak in our code to sort them.
...

          <div className="flex flex-col gap-4 pt-12">
            {commentList
              .sort((a, b) => {
                const aDate = new Date(a.created_at);
                const bDate = new Date(b.created_at);
                return +aDate - +bDate;
              })
              .map((comment) => (
                <div key={comment.id} className="border rounded-md p-4">
                  <p className="font-semibold mb-2">{comment.username}</p>

...
Breaking this down:
- We added
.sortbefore doing.mapin comment list rendering part. - The logic inside
.sortwill arrange from the oldest to the youngest. - The
+sign at the beginning ofaDateandbDateis for castingDatetype tonumbertype, since Typescript'ssort()'s return value has to be innumbertype.
With correct logic, sorting in Typescript is just a piece of cake.
Summary
Now to summarize what we've done so far:
- Created an input form for user to write comments
- Created a comment list section to see all the comments
- Used
insertandselectto create and read the table data.
In the next post we'll do update and delete part, so stay tuned!
Until then, Happy coding!
•
•
•
Comments
Sign in to add comments
Sign in